SWEET TREATS: CHOCOLATE CREPE CAKE

img_20170228_231346_979

Recently I have become a great fan of pancakes and crepes. When I was a child we would always make sweet crepes for Fridays or as Saturday snack. My mum never liked making them as it takes ages. So I was usually the lucky one to spent at least an hour watching golden crepes and perfecting my ‘flipping’ technique. But somehow I enjoyed it, and it has it’s perks of eating hot pancakes when no-one is watching. After all I love a fresh hot crepe on it’s own.

So this year on Pancake day I decided to make a chocolate crepe cake. There are so many ways on how to make them thought. But I settled for a simple recipe from my mum. Because obviously she knows best! Chocolate make it really hard to guess if the pancake is cooked and when it starts to burn. So it took me about 5 pancakes to figure out when I need to turn and not to leave the second side on for too long.

 img_-oamxrr

Chocolate Crepe Cake
(serves 6-80)
Ingredients
1 l milk
440 g plain flour
4 eggs
50 g cocoa powder

700 ml whipped cream
70 g raspberry jam
150 g dark chocolate
150 ml double cream

Sieve the flour and cocoa to break all the lumps and them mix well with milk and eggs. Leave the batter to stand ideally for an hour or 2 in the fridge. Heat up a small frying pan with a few drops of oil. Pour one ladle of batter and spread evenly over the surface of the pan. Turn the crepe over once the edges are coming away from the pan. Each pancake takes about 2 minutes to take but be careful not to burn as batter is dark already. Leave each pancake to cool before putting on top of each other so that you don’t trap too much moisture between them. Once all pancakes are done you are ready to whip the cream.

Spread the cream over each pancake and spread jam after every 5 pancakes. Once all pancakes are stacked up, spread the rest of the cream over the sides. Place a plate on top and leave in a fridge for a few hours or overnight.

For chocolate ganache, bring double cream to boil and then pour over dark chocolate. Leave it to melt and mix well together to dissolve all the lump. Spread the chocolate over the cake and leave to set for about an hour.

20170228_224851
by Maria

Sweet Treats: Naked Raspberry & Chocolate Cheesecake

20160827_211227

I have been neglecting the blog recently. And this is due to my oven being broken and also spending way too much time outdoors. This summer has not been very hot but then I guess I am getting used to the English mild temperatures. Unfortunately my oven decided to give up on me and it seems to be on a mission to wreck every cake I make. So let’s keep the fingers crossed for the engineer to fix it up really quickly.

On the other hand I found a new yummy recipe for an unbaked cheesecake. I have been experimenting a bit with fresh fruits. I know raspberries and chocolate are a superb combination and so I have tried to mix them into the cheesecake. First, I thought it would be a great idea but then I realised that raspberries have fallen apart very quickly and therefore they got a bit lost in the mixture. So I decided to place raspberries on the biscuit base and to keep them intact. I was delighted that the raspberries did not get crushed. But I quickly realised it is not so easy to spread the chocolate on top of them. However the final cheesecake looked really lovely and tasted delicious.

This cheesecake is very rich and the best way it to keep it chilled. I would strongly recommend to take it out of the fridge about half an hour before serving as it is much easier to cut. Also I prefer to eat it at the room temperature.

Sweet Treats: Raspberry & Chocolate Cheesecake (serves 8-10)

Ingredients
170 g digestive biscuits
35 g melted butter
1 tbsp golden sugar
350 ml double cream
200 g soft cream cheese
40 g icing sugar
300 g dark chocolate
200 g fresh raspberries

Line the sides of 9 inch cake tine with baking paper, preferable one with high sides. Brush the side of the tin with melted butter in case the paper does not want to hold on the sides . Crush biscuits with the rolling pin, until they become breadcrumbs. Then mix with golden syrup and butter. Press the crushed biscuits to the cake tin and level out, then leave in the fridge to set.

Place washed and dried raspberries on top of the biscuit base.

IMG_20160827_154713.jpg

Melt the dark chocolate over the boiling water and set aside to cool. Whip the double cream until it thickens, then add icing sugar and cream cheese. Finally add cooled chocolate to the mixture and mix well. Once all the chocolate is incorporated with the cream, transfer the mixture to the tin and spread carefully over the raspberries.

Leave the cheesecake to set in the fridge for at least 4 hours before serving.

by Maria

20160827_210208.jpg

Sweet Treats: Blueberry Tarts


As you probably noticed tarts are somehow my favourite desserts to make. If I am lucky they look and also taste lovely. I am very lucky that my friend has some mini tart tins I could use.

This time I decided to up pastry leftovers I had. It was not enough to make another large tart, I thought, so I made four small ones instead. The decorating was no rocket science as I still had some blueberries in the fridge. And so in the end I managed to make rather cute looking blueberry tarts with a bit of a passion fruit syrup.

I have learnt a few tricks since working with a shortcrust pastry. Never push pastry with a rolling pin to stretch it. Just roll it out with sharp but short strokes. Pastry sometimes crumbles a lot but be patient and it will eventually work. When blind baking always ensure the pastry is crispy and has sort of a biscuity texture before removing the baking parchment with the beans. And once the pastry is turning nicely golden it will be lovely and dry when filled with the cream.

Sweet Treats: Blueberry Tarts with a Passionfruit Syrup

For the pastry
200 g plain flour
100 g cold unsalted butter, cut into cubes
2 tbsp cold water

For the filling
100 ml double cream
4 tbsp passion fruit syrup
250 g blueberries

For the pastry, rub the butter, with your fingertips, into the flour to create a breadcrumb texture. Shake the bowl every now and then to allow large lumps come to the surface. Once the texture is fairly even sprinkle a little bit of water and work the dough with a round end knife until it come together. Bring the dough together with your hands and tip on a surface. Sprinkle the surface with a bit of flour, this will make it easier when rolling the pastry. Sprinkle a bit more flour on the rolling pin and roll the pastry to about 1 mm thickness. Cut the pastry to a slightly larger size than each tin  and lay carefully over each tin. Press the dough into the wrinkled corners of tin using your fingers. Chill for about 20 minutes.

Heat the oven to 200 C/180 C fan/ gas 6. cover the pastry with a baking parchment sand fill with baking beans. Blind bake for about 10 minutes and then without the paper for another 5-8 minutes. Take out of the oven once golden in colour and allow to cool down. Trim the edges with a sharp knife to cut the overhanging pastry.

Whip the double cream until it is about to thicken and then spread over each pastry shell. Spread some of the passion fruit syrup over each tart. Or if you prefer whip the syrup with the cream. Place blueberries in circles starting with  the outer circle. And finally sprinkle a little bit of icing sugar on top.

by Maria

Sweet Treats: Strawberry&Cream Cake

20160522_193427~2

When I think of an early summer I am always reminded of strawberries. They are the first tempting taste of those lovely warm evenings. The gorgeous bright red colour is perfect for the summer and it just gives us a light hint that spring is slowly coming to an end.

Ideally strawberries should be collected in late May or June to ensure they had enough time to develop its full fruity flavour. I still remember impatiently grabbing first crop in my parent’s garden. We had mostly forest strawberries that are much smaller and taste very different from the perfect shop bought ones. But the advantage was that they took less time to ripe and their taste was much stronger. However cooking with these little treasures was not an option. Well I guess it would be if we ever left them alone. But we had a perfect excuse of ‘protecting’ them from evil snails.

My mum always made some strawberry jam and the making of it made our house smell like fairytale. She loved leaving big pieces of strawberries so that we had juicy chunks mixed with delicious sweet and sticky juice. Later she admitted to us that she just didn’t fancy chopping all the fruits. Apparently she found it far to tedious.

This cake is very simple and takes only and hour or so to make. The sponge itself is a basic Victoria Sponge recipe. I love the combination of rich cream with fruitiness of the strawberries and delicious vanilla sponge. You can also add some jam if you wish to sandwich the two sponges.

Sweet Treats: Strawberry&Cream with Vanilla Sponge Cake (serves 8-10)

4 medium eggs
225 g softened unsalted butter
220 g self raising flour
220 g caster sugar
2 tsp baking powder
1 tsp vanilla essence

200 ml double cream
2 tbsp strawberry jam
1 packet of strawberries (about 200 g)

Preheat the oven to 180° C/150° C fan. Grease the 2 sandwich tins with butter and dust with flour, or with greaseproof paper.

Whip the softened butter with sugar until pale, and then add eggs, and the rest of the ingredients. Mix until combined. The mixture should be light and easy to spread. Do not over-mix as that would stop sponges from rising. Fill both tins with roughly the same amount of the mixture and place in the oven next to each other.

Leave to bake for about 20-25 minutes. You might need to rotate your tins in the oven to allow an even bake. Check the cake after about 20 minutes and test with a toothpick. if the toothpick comes out clean then sponge are done. Set aside to cool for about 5 minutes. Then release both sponges from the tins and leave to cool on the side, preferably on a cooling rack if you have one.

Whip the double cream until it is just about to start to thicken. Then spread over both sponges. If you wish you can also spread strawberry jam over the bottom sponge. Place some of the sliced strawberries on the top of the sponge and sandwich both layers together. Scatter the rest of the strawberries on the top of the cake and dust with icing sugar.

by Maria

Sweet Treats: Rhubarb Tart

wp-image-1108217091jpg.jpg

I was thinking recently that I have never tried to bake or prepare rhubarb. This is such an lovely ingredient and still I was never even tempted to try. However this time, I realized that rhubarb is actually in season, as I stood in the veg and fruit section in one of my local shops. So I grabbed a packet and decided to make a tart for my friends as they were coming for lunch in a couple of days.

When I make tarts I always prepare my own pastry. I used the shop-bought one a couple of times and I must admit it is an easy option. But I just love making it myself. It is not so difficult and you can most definitely spot the difference in the texture and also in the overall taste. My hands are usually very cold and this is very useful when working with butter. Some recipes suggest to use food processor when starting the breadcrumb process but I prefer to do it myself. In this way I get a better feeling on how much more liquid is needed and how the pastry is binding together.

Rhubarb itself is super easy to prepare. I bought the forced rhubarb which was unfortunately more green than lovely pink colour. But once cooked the colour became paler and lighter. I was unsure whether the round tin will work when arranging the stalk. But then I figured out the way of placing each segment without breaking it too much.

Sweet Treats: Rhubarb Tart (serves 8)

450 g rhubarb, trimmed and cut into 13 cm long batons
1 tsp vanilla essence
50 g caster sugar
juice form 1/2 lemon

For pastry
225 g plain flour
20 g ground almonds
2 tbsp icing sugar
140 g cold unsalted butter
1 egg yolk

For creme patisserie
250 ml milk
2 egg yolks
2 rbsp caster sugar
1 tbsp cornflour
1 tbsp plain flour
50 ml double cream

Put sugar, vanilla essence and lemon sugar with about 300 ml water in a wide pan or casserole and bring to boil over the low heat. Once the sugar is dissolved add the rhubarb batons and ensure that rhubarb is covered with the liquid. Leave to simmer for about 5 minutes. Then take from the heat and allow to cool. Keep the rhubarb in the sirup for another 1 hour or up to 1 day.

For the pastry, mix butter and flour with almonds and sugar in a bowl. Use your fingers to break the chunks of butter and to create breadcrumb texture. Stir the ingredients every now and then to allow large chunks come to the surface. Then add egg yolk and dribble of 1-2 tbsp cold water. Knead the pastry briefly to allow all ingredients come together and to form a dough. Wrap in cling film and allow to chill for 30 minutes in the fridge.

For creme patisserie, place milk and vanilla essence on the hob and bring to boil on a medium heat. Whilst milk is coming to a boil, whisk the egg yolks and sugar together with flour in a bowl, until pale and light. Pour the hot milk whilst whisking the eggs mixture. Place the mixture back on the medium heat (in a clean pan) and stir continuously until it becomes thick and covers the back of the spoon. Be careful with the heat at this stage, as creme is very likely to stick and burn at the base of the pan. Scrape the creme into a bowl and cover it to prevent the skin formation. Chill for 1 hour and up to 2 days.

Roll out the pastry to about 1-2mm thickness  and line the tart tin. Press the pastry into the flute edges of the tin and ensure it is also overhanging the edges of the tin. Chill for another 30 minutes. Heat the oven for 200 C/180 C fan/ gas 6. Line the pastry with a baking parchment and place baking beans on top. Blind bake for 20 min and temvoe the baking parchment. Then bake for another 6-8 minutes until pastry is golden and dry. Whilst pastry is still hot trim the edges of the tin with a sharp knife. Cool in the tin.

Remove the rhubarb from the syrup and set aside. Then bring the syrup to boil until it becomes thick and sticky. Leave on the side to cool down.

Whisk the cream until stiff and carefully fold in the creme patisserie. Fill the pastry case with the creme patiserrie and smooth the surface. Then line the rhubarb on the creme and ensure the whole surface is covered with the rhubarb. Glaze the tart with the rhubarb syrup and chill for 30 minutes.

wp-image-2107291149jpg.jpg

by Maria

Sweet Treats: Scotch Pancakes with Pomegranate

Recently I was not able to bake or cook as I had my laser eye surgery. So looking into the hot oven was definitely not an option. And even though reading seems to be a bit of a challenge, my vision is slowly coming back and improving.

However having all this time off work also allowed me to have a more relaxing breakfast once everybody has left. I am a huge fan of fry up and that is probably my ideal weekend treat. This time I didn’t feel like heavy fried bacon and sausages. I was craving something warm but this time I was thinking of a sweet breakfast. Quick look on the internet and there they were pancakes! There is hundreds ways of how to have your pancakes but I decided to make Scotch ones with lots of delicious pomegranate and a bit of dark chocolate.

I must admit that I always loved making crepes and having them with cream and fruits was my absolute signature dessert, when I was a teenager. But having thick and fluffy scotch pancakes for a breakfast is another perfect of spoiling myself and a few other lucky ones.

Scotch Pancakes with Pomegranate

100 g plain flour
50 g caster sugar
splash of milk
1 egg

Sift the flour with sugar. Add beaten egg and mix well together with a whisk. At this stage, your mixture will be lumpy and floury. Slowly add milk allowing the batter to become thick and more liquid (similar to thickness of usual double cream).

Grease the frying pan with oil, only a drop or so is enough. Heat the pan with until it is hot. Then pour the first ladle of batter. Pancakes are usually ready to be turned when bubbles develop on the surface. Cook each side for about 2 minutes until golden.

Once all pancakes are done, spread yoghurt over the pancakes and stack as many as you like on top of each other. Pour more yoghurt and sprinkle with pomegranate seeds. Top with shavings of dark chocolate or honey.

by Maria


Sweet Treats: Raspberry&Chocolate Macarons

20160422_192856~2.jpg

These macarons came as an inspiration from watching far too many videos on Instagram. Working with chocolate can be rewarding but also pretty damming. Chocolate is very temperamental and needs to be very liquid when doing the straight lines. I had a real problem to transfer it from a bowl into my piping bag. But I found the easiest way was to put the piping bag into a high glass and wrap the end of the bag around the edges. This way I could use both hands, one to hold the bowl and another to scrape chocolate with spatula.

I like to sandwich my macarons with light filling if possible. The shell itself is fairly sweet so I usually try to find a way to avoid adding more sugar into the filling. Double cream is very easy to get in any of the shops and I think it works very well. But feel free to use whipping cream if you prefer.

Although I had to work this weekend, somehow I managed to find enough time and to pop to my favourite bookshop on Saturday. Waterstones at Piccadilly has an excellent selection of books and I was salivating over a number of patisserie books they had. No matter how many books I buy, I could still spend most of my monthly wages just on cookery books and random utensils for the kitchen. Unfortunately for my credit card, I even took pictures of books that will need to be purchased soon, very soon. I believe this matter is urgent….

Sweet Treats: Raspberry&Chocolate Macarons (makes 18)

For the macaron shells
95 g egg white
75 g caster sugar
152 g icing sugar
123 g ground almonds
pink food colouring (preferably gel)

For the filling
200 ml double cream
2 tbsp raspberry jam

For the decoration
35 g dark chocolate

Whisk the egg whites until stiff. Add the caster sugar gradually while you are whisking the egg whites. Add a small bit of food colouring to the meringue. Mix thoroughly and add more colouring if needed. Sift flour and icing sugar in a separate bowl and add ground almonds. Slowly fold the flour mixture to the egg whites and be very careful not to over-mix.

Transfer the mixture to a piping bag and pipe onto a baking sheet. Drop the baking tray on a flat surface to allow air bubbles to come out. Allow to stand for 10-15 minutes until the surface of each macaron is no longer sticky when you touch with your finger. This allows the macaron to rise evenly when baking. Preheat the oven to 170°C/150°C fan/mark 4.

Put into the oven for 10-13 minutes. Keep checking during the baking as you might need to rotate the tray to allow an even bake. Once baked, allow to cool down, then transfer from the baking sheet. If macaron shells are too sticky, it means they need a bit longer in the oven.

For the filling, whisk double cream until it is about to thicken. Then add raspberry jam and transfer to the piping bag. Pipe a small amount of the filling on one of the shells and sandwich together.

Melt chocolate in the microwave for 20-30 seconds until all melted. Transfer to the piping bag with a very fine round nozzle. You can practice your first lines with chocolate on the board. Place macarons all together on the board and pipe chocolate by making quick movements from tip to bottom of the tray. Chocolate needs to be fairly liquid so that the lines will be as straight as possible. Allow to set for about 20 minutes and then place the macarons into the fridge.

20160422_192008~2

Macarons need to ‘mature’ for at least 24 hours. Or in other words they taste better on the third day.

by Maria

Sweet Treats: Chocolate & Pomegranate tart

20160411_210413~2~2

Chocolate is easy to combine with most fruits and I particularly love the combination of the rich red pomegranate and the dark chocolate. This tart is fairly rich, so be warned, you might want to eat it in one go. I was also taken by shortcrust pastry and how easy it is to make. Adding various colours and also flavour to the pastry makes it more personal. My hands are always cold so I don’t have to ever worry about melting the butter. You can use this basic recipe for sweet and also for savoury tarts. Feel free to replace it with one bought in a shop (you will need about 350 g).

When making the filling, remember that chocolate tends to fall down to the base. So ensure you mix it very well bringing the chocolate from the bottom of the bowl.

Sweet Treats: Chocolate and Pomegranate Tart (serves 8-10)

For the shortcrust pastry
200 g plain flour
100 g cold butter, cut into small cubes
2 tbsp of cold water
red or pink food colouring

For the chocolate filling
100 g dark chocolate and 100  of white chocolate
6 tbsp melted butter
2 eggs and 3 egg yolks
4 tbsp caster sugar
1 pomegranate and cocoa powder to for dusting

To make shortcrust pastry, toss and coat cubes of butter with flour, then with your fingertips rub the butter into the flour until it forms breadcrumbs. Shake the bowl every now and then to allow larger cubes come to the surface. Add water and food colouring, keep mixing with a rounded knife which will prevent transferring heat from your hands to the dough. Finally, gather the dough with you hands and kneed on lightly floured surface until you have a smooth ball. Roll out the dough on a flat surface to a slightly larger size than the tart tin (around 5 cm extra). Carefully place pastry on the rolling pin and transfer to the tin. Press lightly into the corners ensure not air bubbles are left on the base of the tin. Chill for 20-30 minutes.

Heat the oven for 200°C (or 180°C fan/gas 6). Prick the base of the tart with a fork to create holes. Place baking parchment on the pastry and fill with baking beans to weight it down. Bake for 15 minutes, then carefully remove the paper and put back into the oven for another 5 minutes. Once the pastry is done, trim the edges so they are nice and smooth. Use a sharp knife to prevent breaking big chunks of pastry.

To prepare the filling, lower the oven to 180°C (or 160°C fan/gas 4). Melt both dark and white chocolate in a bowl over slightly simmering water. Then stir the melted butter. Whisk the eggs and sugar together with electric whisk until pale and thick. This would take about 10 minutes. Be patient: if the eggs are not whisked enough, then the mixture will not rise in the oven. Fold in the melted and cooled chocolate with a large spoon. Mix very carefully so you will not knock out the air. Transfer into the tart tin and put into the oven. Bake for 20-25 minutes until the surface of the tart is puffed and set. The tart will still have a bit of a wobble. Take out of the oven and allow to cool down. Chill for at least 4 hours before serving.

Once ready to be served sprinkle with pomegranate seeds and cocoa powder.

20160411_211917~2

by Maria

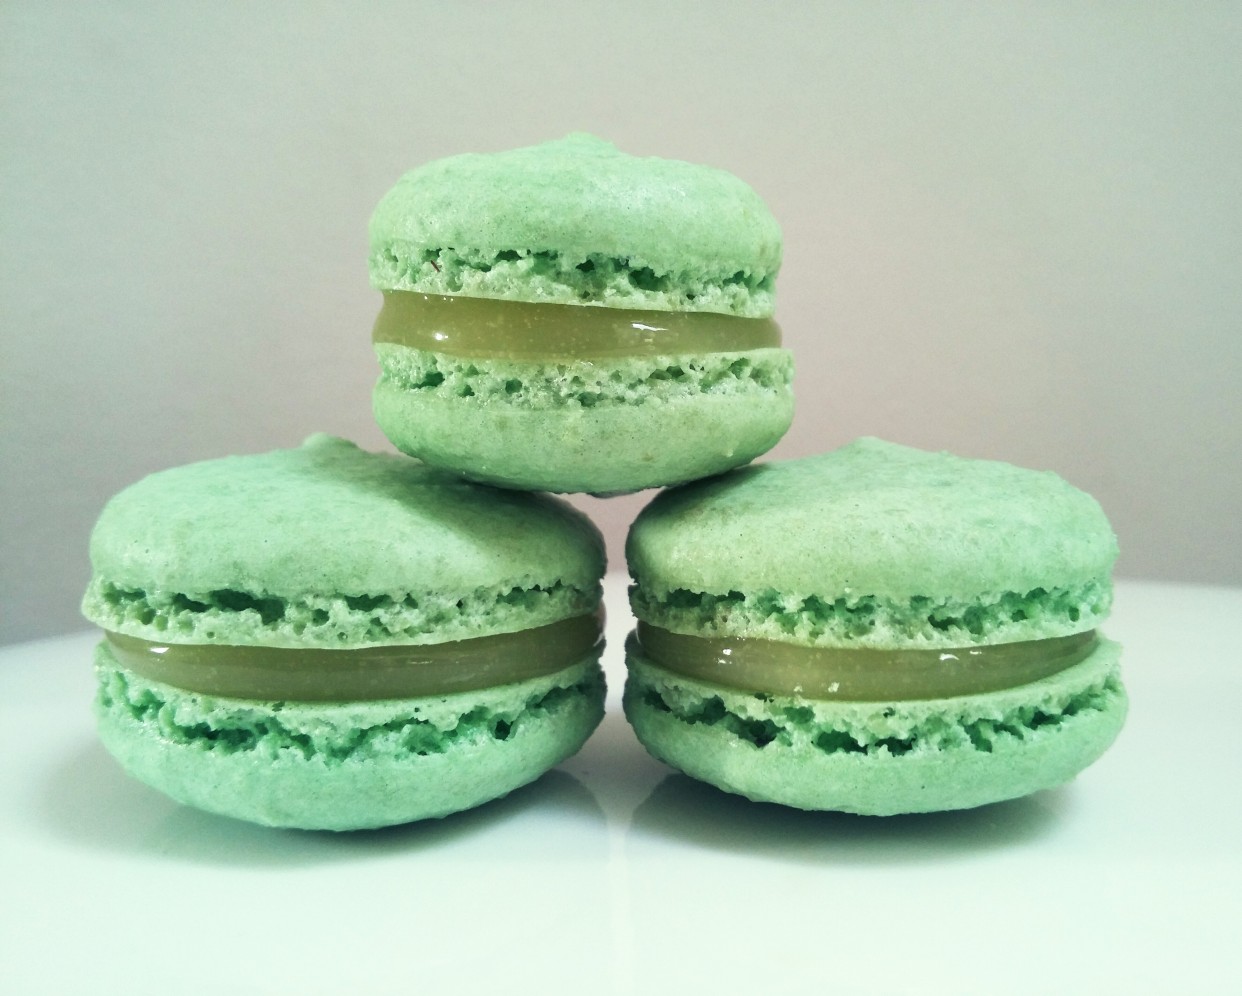
Sweet Treats: Lemon Macarons

20160402_151730~2.jpg

Macarons have become my weekend treat. I enjoy making them and find it ever so satisfying to come up with new flavours and colour combinations. There really isn’t too much to it. Just ground almonds, sugar, eggs and of course food colouring.

I have been obsessed with perfecting my chocolate macarons. It takes a little bit of time to get the mixture right and also learn to use a right oven temperature. But this time I was tempted to make a colourful and fresh citrusy tasting ones. Lemon curd is a great filling as it contains butter, therefore it is really easy to pipe. Plus you will most probably have some leftover lemon curd that could be used for next time. If you don’t fancy making it, then shop bought one will be just fine.

My friend watched me the other day when I was banging the baking tray to get rid of the air from the macaron shells. She thought I was upset and that it didn’t work. However, she did laugh after I explained that it is super important to knock the air out so that the shells are not hollow. She probably think I am insane but then again she is too polite to say anything.

Sweet Treats: Lemon Curd Macarons

For macaron shells
95 g egg white
75 g caster sugar
152 g icing sugar
123 g ground almonds
green food colouring (preferably gel)

For lemon curd
65 ml fresh lemon juice
65 g caster sugar
1 whole egg plus 1 egg yolk
65 g unsalted cold butter, cut into small chunks
pinch of salt

Whisk the egg whites until stiff. Add the caster sugar gradually while you are whisking the egg whites. This allows the macarons to develop their characteristic shine. Add a tiny bit of food colouring to the meringue. Sift flour and icing sugar in a separate bowl and add ground almonds. Slowly fold the flour mixture to the egg whites and be very careful not to over-mix.

Transfer the mixture to a piping bag and pipe onto a baking sheet. Drop the baking tray on a flat surface to allow air bubbles to come out. Allow to stand for 10-15 minutes until the surface of each macaron is no longer sticky when you touch with your finger. This allows the macaron to rise evenly when baking. Preheat the oven to 170°C/150°C fan/mark 4.

Put into the oven for 10-13 minutes. Keep checking during the baking as you might need to rotate the tray to allow an even bake. Once baked, allow to cool down, and then transfer from the baking sheet. If macaron shells are too sticky, it means they need a bit longer in the oven. However, remember that the tray will be hot and will continue to cook the shells even after you take it out of the oven.

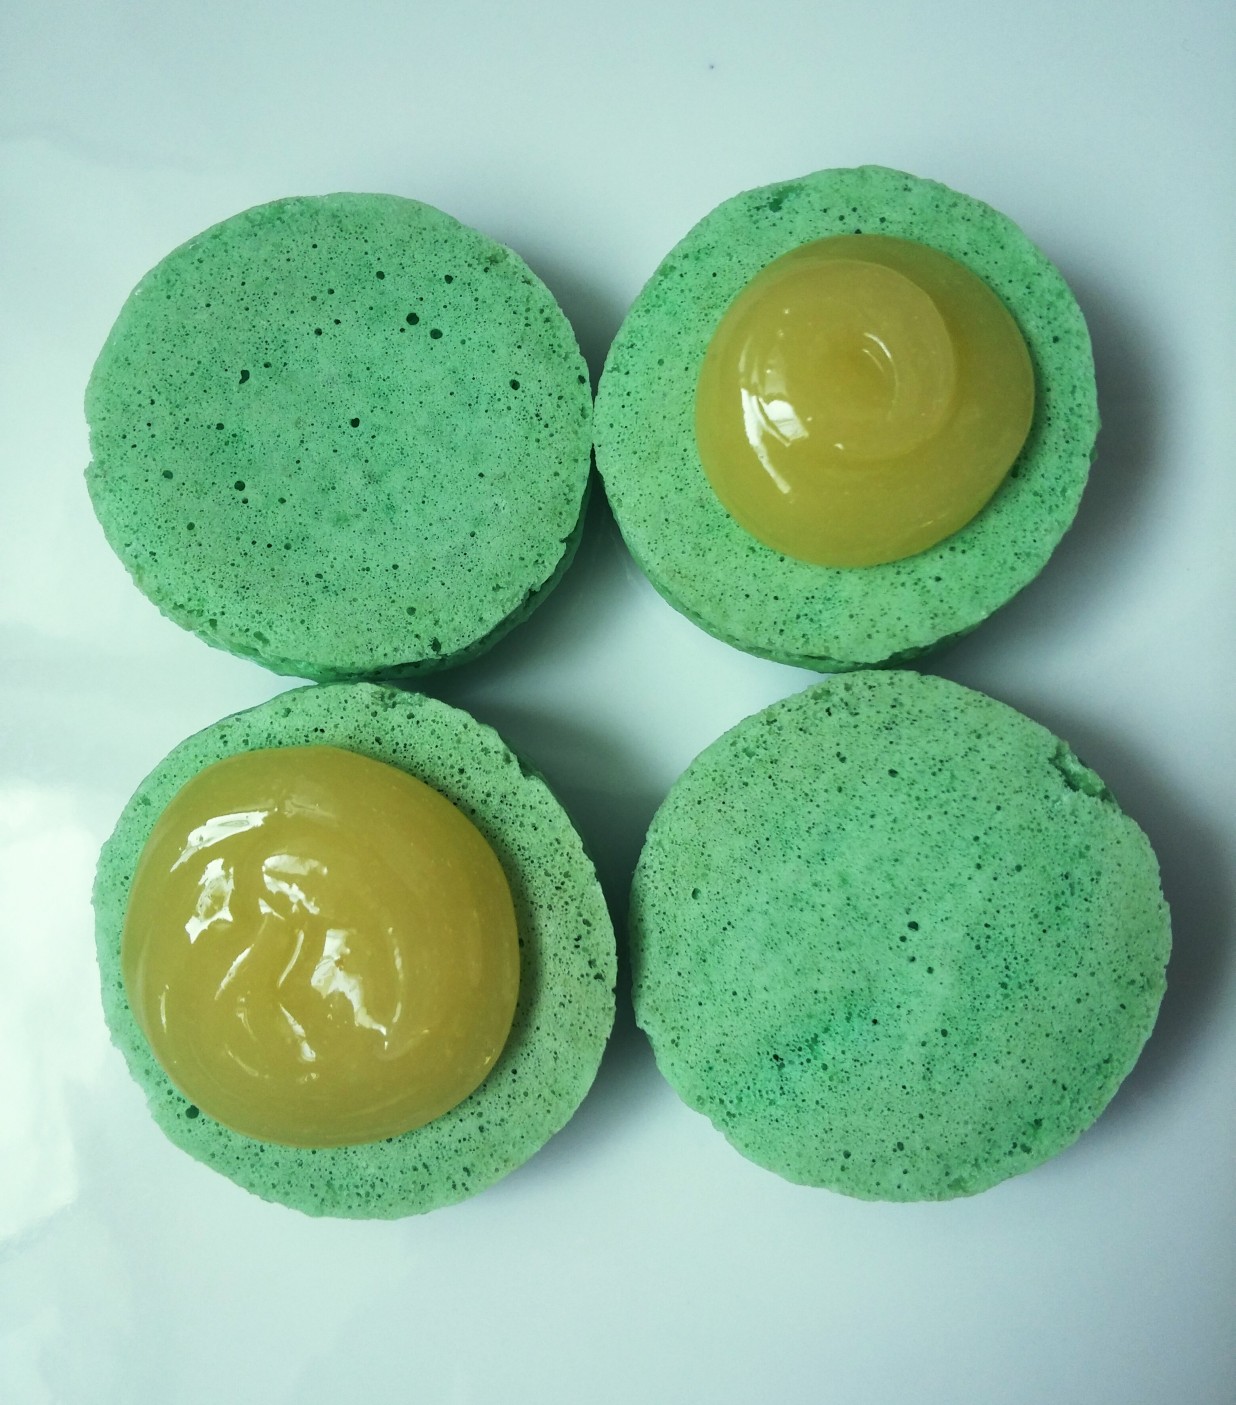
For the lemon curd, whisk eggs with sugar, then add lemon juice and place over the bain marie. Stir continuously with a wooden spoon until the mixture thickens and continue to cook for further 5 minutes. The curd is ready when it coats the back of the spoon and you should be able to draw a path through it. Remove the curd from the heat and quickly whisk in the cold butter until it is completely dissolved and glossy. Transfer the curd into a clean bowl and allow to cool. Place the cling-film over the top of the curd to prevent the skin formation.

20160402_151007~2.jpg

Pipe lemon curd onto one macaron shell and then sandwich together. Macarons will keep for 4-5 days in the fridge.

by Maria

Sweet treats: Chocolate Cigarello Cake

Screenshot_2016-03-07-22-47-47~2~2.jpg

Long Easter weekend is coming! And a lot of chocolate with it. I am not so keen on Easter eggs so I came up with a stylish Chocolate Cigarello Cake to share at our friend’s lunch. It is very rich and I can assure you, everyone will love it!

Dark chocolate is amazing and always balances the sweetness of the sponge with the caramel. However, if you are not a fan of ‘bitter’ chocolate you can easily replace it with milk or white chocolate cigarellos. I use Chocolate Trading Co for my cigarellos as they come beautifully uniform and precise. They also taste fantastic and have an excellent crunch. You can choose the volume you need from a small batch to a large one depending on how many cakes you are planning to  make. The delivery is very efficient and cigarellos are packaged really well to prevent any damage. However be aware you might need to buy more cigarellos, in case the crumble once you start working with them.

I must admit that I failed miserably on my attempts to make these beautiful decorations. No matter how many videos I have watched and practised… Working with fragile chocolate is difficult enough when trying to get the temperature and roll consistent for all cigarellos. My determination in this case was simply not enough. And trust me I am a one determined baker!

Fruits are excellent as a decoration on the top of the cake. They bring fresh and citrus flavour and also lighten up the cake. Strawberries, raspberries and also blueberries with redcurrants would work really well. I love having my cake with fruit whenever possible!  Especially now when the spring is in it way. Well one hopes it’s on its way…

facebook-20150104-214132~2

Chocolate Cigarello Easter Cake (serves 12-14)

For Chocolate Sponge
175 g lightly salted butter, plus 10 g for greasing
75 g dark chocolate
300 g plain flour
375 g golden caster sugar
25 g cocoa powder
1 tsp bicarbonate of soda
2 medium eggs
200 g buttermilk
100 ml boiling water

For Vanilla Sponge
4 medium eggs
225 g softened unsalted butter
220 g self raising flour
220 g caster sugar
2 tsp baking powder
1 tsp vanilla essence
pink and purple food colouring

For the chocolate ganache
250 g dark chocolate
180 ml of double cream

For the Filling
1 tin of Carnation Caramel

box of 50 chocolate cigarellos
various fruit (optional)

Heat the oven to 180°C/160°C fan/mark 4. Grease with butter and line two 8-inch cake tins. For Chocolate Sponge, boil the kettle with water. Put chocolate, broken in small pieces, and butter into a small pan, then heat gently and continuously stir until melted. Mix flour, sugar, cocoa, and soda bicarbonate together with a pinch of salt in a bowl. Whisk the eggs and buttermilk until lighter in colour then add to the flour mixture together with melted chocolate. Add 100 ml of boiling water and whisk preferably with electrical whisk, until the mixture is lump free.

Divide the cake mixture into two tins and bake in the oven for 20 minutes. Remember to swap tins halfway through the bake if place on different shelves in the oven. Once the cake is ready and the skewer comes out clean when testing, take the cake out of the oven and allow to cool down.

For a Vanilla Sponge, grease and line one 8-inch cake tin. Whip the softened butter with sugar until pale, and then add eggs, and the rest of the ingredients. Mix until combined. The mixture should be light and easy to spread. Transfer the mixture to a cake tin and bake for 15-20 min until skewer comes out clean. Carefully remove the cake from the tin and allow to cool down.

Once all the sponges are cool, trim all three so that they are same depth. It is very helpful to put them all on top of each other and compare to the hight of the chocolate cigarello. That will give you a rough idea on how high each sponge needs to be. Spread caramel on the bottom chocolate sponge followed by vanilla sponge and finally by the second chocolate sponge. Be generous with the caramel as it will also absorb into the sponges. Put the cake into the fridge for about 30 min.

For the chocolate ganache, pour the double cream into a heavy based pot and bring slowly to boil. Then pour over broken chocolate and leave it to melt the chocolate for a couple of minutes. Once all the chocolate has melted, pour half of the chocolate ganache over the cake and spread over the sides of the cake. Then you can start attaching cigarellos to the side of the cake. Ganache will act as a glue and help to position each roll. This will get messy but keep cigarellos tight together and make sure they are vertical to the work surface. You can keep adding fresh ganache in case cigarellos do not stick to the cake properly.

20160113_151601~3.jpg

Once all cigarellos are attached pour leftover ganache on the top of the cake. Set aside preferably in a cod place to allow the chocolate to set. Add the fruit on top of the cake and dust with icing sugar.

by Maria