Sweet Treats: Mango & Passion Fruit Roulade

20160305_170004~2 (1).jpg

Now that Easter Eggs are all eaten, I am craving a slightly lighter desserts. I love making sponges and especially this airy roulade sponge. It is very easy to put together and taste superb with fruits. Unfortunately strawberries and raspberries are not yet in season. And even though shops are already filled with amazing colours most fruits still lack the lovely sun-kissed taste of the summer. So I decided to use mango again, and of course my current favourite, passion fruit!

If you feel double cream is too heavy,  please feel free to replace it with whipping cream. It will work perfectly well and spreading it is much easier as it is less likely to curdle. Adding vanilla essence will also bring out lovely soft but not overly sweet flavour.

I have gone into one of those moods the other day and looked up the amazing patterns of Swiss rolls around the world. I would be lying if I said I was not super jealous of stunning, imaginative and artistic rolls. But then practice makes it perfect and maybe one day I will be posting my own ‘impressionistic’ Swiss roll. I will keep you posted anyway… 😉

Mango and Passion Fruit Roulade (serves 6-8)

3 eggs
85 g aster sugar
85 g plain flour
1 tsp baking powder
1 tsp vanilla extract

1 ripe mango
1 or 2 passion fruit
200 ml double cream
icing or caster sugar for dusting

Preheat the oven to 190 (170 fan, gas mark 6). Line baking tray with baking parchment, preferably oblong tray with even surface.

Whisk eggs with caster sugar until pale and light in texture. This will take good 5 minutes with an electric whisk. Then carefully fold in the flour mixed with baking powder, using large spoon or spatula. Add the vanilla extract. Spread the mixture to the baking tray and put into the oven for 10-13 minutes. The baking time varies due to the thickness of the sponge. Once sponge is turning golden and springs back when touched, take out if the oven. Leave to cool slightly. Then separate sponge from the parchment and turn on clean baking parchment, then roll it whilst still it is warm. Keep in the rolled position until completely cool.

Whip double cream until just almost solid. Spread over the unrolled sponge. If you whip the cream too much it will start to curdle when spreading. Always ‘underwhip’ the cream so that is still slightly liquid. Scatter chopped mango and one or two passion fruits over the sponge. Them roll the sponge carefully whilst using baking parchment to hold the outside. Leave in the fridge to cool for about 2 hours. Dust with icing sugar before serving.

20160305_155757~2.jpg

by Maria

Sweet treats: Chocolate Cigarello Cake

Screenshot_2016-03-07-22-47-47~2~2.jpg

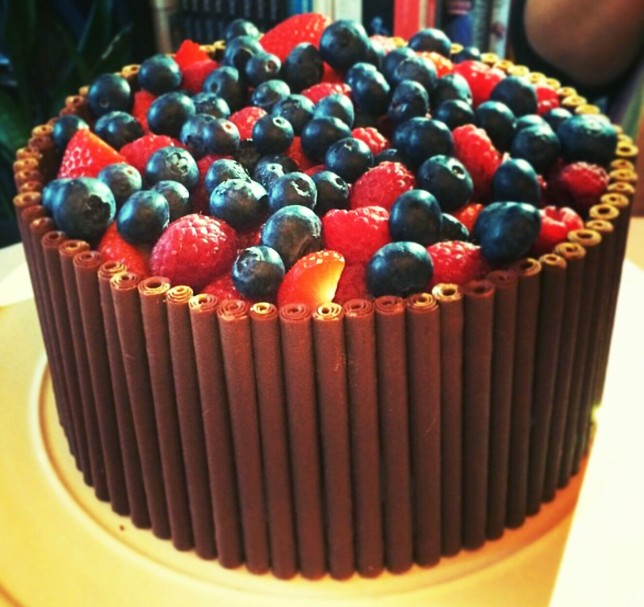
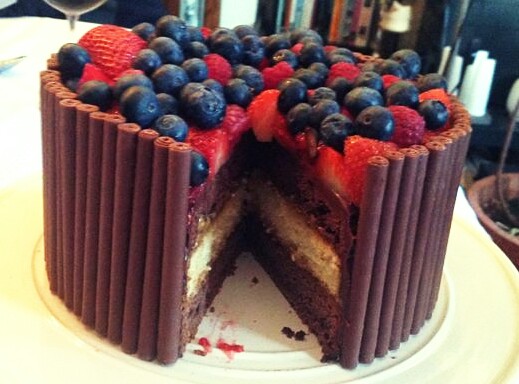
Long Easter weekend is coming! And a lot of chocolate with it. I am not so keen on Easter eggs so I came up with a stylish Chocolate Cigarello Cake to share at our friend’s lunch. It is very rich and I can assure you, everyone will love it!

Dark chocolate is amazing and always balances the sweetness of the sponge with the caramel. However, if you are not a fan of ‘bitter’ chocolate you can easily replace it with milk or white chocolate cigarellos. I use Chocolate Trading Co for my cigarellos as they come beautifully uniform and precise. They also taste fantastic and have an excellent crunch. You can choose the volume you need from a small batch to a large one depending on how many cakes you are planning to  make. The delivery is very efficient and cigarellos are packaged really well to prevent any damage. However be aware you might need to buy more cigarellos, in case the crumble once you start working with them.

I must admit that I failed miserably on my attempts to make these beautiful decorations. No matter how many videos I have watched and practised… Working with fragile chocolate is difficult enough when trying to get the temperature and roll consistent for all cigarellos. My determination in this case was simply not enough. And trust me I am a one determined baker!

Fruits are excellent as a decoration on the top of the cake. They bring fresh and citrus flavour and also lighten up the cake. Strawberries, raspberries and also blueberries with redcurrants would work really well. I love having my cake with fruit whenever possible!  Especially now when the spring is in it way. Well one hopes it’s on its way…

facebook-20150104-214132~2

Chocolate Cigarello Easter Cake (serves 12-14)

For Chocolate Sponge
175 g lightly salted butter, plus 10 g for greasing
75 g dark chocolate
300 g plain flour
375 g golden caster sugar
25 g cocoa powder
1 tsp bicarbonate of soda
2 medium eggs
200 g buttermilk
100 ml boiling water

For Vanilla Sponge
4 medium eggs
225 g softened unsalted butter
220 g self raising flour
220 g caster sugar
2 tsp baking powder
1 tsp vanilla essence
pink and purple food colouring

For the chocolate ganache
250 g dark chocolate
180 ml of double cream

For the Filling
1 tin of Carnation Caramel

box of 50 chocolate cigarellos
various fruit (optional)

Heat the oven to 180°C/160°C fan/mark 4. Grease with butter and line two 8-inch cake tins. For Chocolate Sponge, boil the kettle with water. Put chocolate, broken in small pieces, and butter into a small pan, then heat gently and continuously stir until melted. Mix flour, sugar, cocoa, and soda bicarbonate together with a pinch of salt in a bowl. Whisk the eggs and buttermilk until lighter in colour then add to the flour mixture together with melted chocolate. Add 100 ml of boiling water and whisk preferably with electrical whisk, until the mixture is lump free.

Divide the cake mixture into two tins and bake in the oven for 20 minutes. Remember to swap tins halfway through the bake if place on different shelves in the oven. Once the cake is ready and the skewer comes out clean when testing, take the cake out of the oven and allow to cool down.

For a Vanilla Sponge, grease and line one 8-inch cake tin. Whip the softened butter with sugar until pale, and then add eggs, and the rest of the ingredients. Mix until combined. The mixture should be light and easy to spread. Transfer the mixture to a cake tin and bake for 15-20 min until skewer comes out clean. Carefully remove the cake from the tin and allow to cool down.

Once all the sponges are cool, trim all three so that they are same depth. It is very helpful to put them all on top of each other and compare to the hight of the chocolate cigarello. That will give you a rough idea on how high each sponge needs to be. Spread caramel on the bottom chocolate sponge followed by vanilla sponge and finally by the second chocolate sponge. Be generous with the caramel as it will also absorb into the sponges. Put the cake into the fridge for about 30 min.

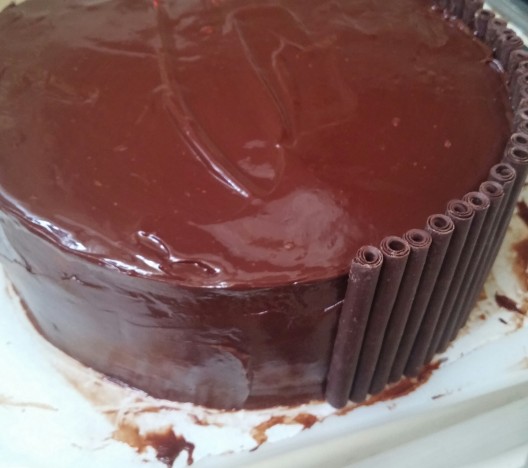
For the chocolate ganache, pour the double cream into a heavy based pot and bring slowly to boil. Then pour over broken chocolate and leave it to melt the chocolate for a couple of minutes. Once all the chocolate has melted, pour half of the chocolate ganache over the cake and spread over the sides of the cake. Then you can start attaching cigarellos to the side of the cake. Ganache will act as a glue and help to position each roll. This will get messy but keep cigarellos tight together and make sure they are vertical to the work surface. You can keep adding fresh ganache in case cigarellos do not stick to the cake properly.

20160113_151601~3.jpg

Once all cigarellos are attached pour leftover ganache on the top of the cake. Set aside preferably in a cod place to allow the chocolate to set. Add the fruit on top of the cake and dust with icing sugar.

by Maria


Sweet Treats: Passion Fruit Macarons

IMG_20160321_142136

Happy Macaron Day to all!!

It has been a few years since I tried making my first batch of these delightful treats. To be honest with you I have made a plenty of attempts before I got even half decent macaron shell. But I never gave up on the idea! It is so incredibly rewarding once you master a magic art of preparing them in a correct way. In the end you will be ever so proud to see them come out of the oven! So lovely, shiny, round and standing on their ‘feet’.

I feel that using the right ingredients makes a huge difference. And one of the very important things is to age the egg whites. You can either separate egg yolks from egg whites and store them in a fridge for 24 hours. I am not particularly keen on this method, as I do not like to keep the separated eggs in my fridge. What works for me is simply using ‘older’ eggs. I always buy eggs one or two weeks in advance and simply keep them out the fridge so they come to room temperature before whisking.

This particular recipe is my favourite as I only recently fell in love with passion fruit. The trick is to keep it until the skin becomes all wrinkled and a bit crunchy/dry. The actual fruit inside is then wonderfully sweet and just perfect to use for the filling. Of course, I mix it with slightly bitter chocolate ganache which goes really well with the sugary macaron shell. I decided to use double cream in this recipe, which does not add any more sweetness but still holds the flavour very well.

20150712_190132~2

When deciding on the colour of your shell, you can either use a small amount of the food colouring to create light shade or add a wee bit more to create a rich and deep colour. But be careful when adding the colouring as this could change the texture of the meringue and  macarons they will not rise. Also overworking the mixture, when you try to get the colour evenly spread, would cause knocking too much air out. In this way mixture because too runny and spreads too much on a baking sheet. I usually add the gel food colouring just towards the end of making a meringue.

Passion Fruit Macarons (makes 18)

95 g egg white
75 g caster sugar
152 g icing sugar
123 g ground almonds
yellow food colouring (preferably gel)

For the chocolate ganache
80 ml double cream
one passion fruit (you could also use two depending on the size of each)

Whip the egg whites until still. Keep in mind that you have to add the caster sugar gradually while you are whipping the egg whites. This allows the macaroons to develop their characteristic shine. Add a tiny bit of food colouring to the meringue. The easiest way is to use a toothpick. You can easily regulate how much colour you need to use. Sift flour and icing sugar in a separate bowl and add ground almonds. Slowly fold the flour mixture to the egg whites and be very careful not to over-mix.

Transfer the mixture to a piping bag and pipe onto a baking sheet. Drop the baking tray on a flat surface to allow air bubles to come out: in simpler words, knock the air out. Allow to stand for 10-15 minutes until the surface of each macaron is no longer sticky. This allows the macaron to rise evenly when baking. Preheat the oven to 170°C/150°C fan/mark 4.

Put into the oven for 10-13 minutes. Keep checking during the baking as you might need to rotate the tray to allow an even bake.

Once baked, allow to cool down, and then transfer from the baking sheet. If macaron shells are too sticky that mean they need a bit longer in the oven. However remember the tray will be hot and will continue to cook the shells even after you take it out off the oven.

For the filling, whip double cream until it still has a bit of a runny texture. If you over whip it, then cream could split when piping onto shells. Add the inside of one passion fruit by scrapping each half. You can also add two passion fruits as long as the filling does not become too runny. Mix well and transfer into a piping bag.

Match two shells so that their size will be as similar as possible. Pipe a little bit of double cream filling on one macaron shell and sandwich together with the second one. Leave to cool in the fridge. Macarons are best on the next day and ideally kept in the fridge. Take them out of the fridge about an hour before eating, to allow the filling to warm up to room’s temperature.

by Maria

Cannelloni with aubergine and ricotta

Photo 07-02-2016, 15 54 01.jpg

Fresh pasta is one of the easiest dish to prepare in the kitchen, yet too often dismissed as elaborate, time consuming, and messy. In reality, all you need is flour, eggs, and the will to prepare it. Fresh pasta opens really many options for food. You can prepare traditional basic dishes such as lasagne or tagliatelle, or you can venture out into more creative stuffed pasta types, such as ravioli, tortellini, caramelle (pasta candies), or baskets. I chose cannelloni for today’s meal because I had some aubergine to use and because I felt a bit nostalgic.

Cannelloni to me means tradition, home, simplicity. Close your eyes and think of a wooden table lightly covered by flour. Now, feel that coarse, grainy surface and look outside to see a warm, late morning. You are in my auntie’s kitchen, in Bologna; it is a small flat in the city, but the little garden in front of the building is enough to relieve you from any wish to be in the quiet countryside. She walks in, holding a bag of flour and a few eggs, makes a little white mound with a well in the middle–we call it fontana, fountain–and cracks two or three eggs in it. Then it’s like finger finesse: you see one hand first mixing the ingredients slowly and in no time both hands are working together with the mix ready to be kneaded.

Every time I sit there and watch, I start asking her silly questions, like a little kid wondering about the secret of a magic trick, but it’s all there in front of me. “Just work the dough for a ten minutes and then set it aside for half hour, well covered”, she says. The next step will be the rolling pin. In the meantime, you can choose what you want to eat and make the stuffing or the sauce ready.

Cannelloni are one of the simplest, yet most refined uses of fresh pasta. I genuinely love them. It is not my favourite meal, but I have a huge crush on them and there is nothing I can do about it, but eating them. If regularly, even better.

A similar addiction struck the Italian poet Gabriele d’Annunzio, who was indeed a modern gourmand ante litteram. In his energetic and passionate life made of military stiffness and hedonistic pliability, living his duality of aesthetics in a rigor of opulence, he literally depended on the caring attention of his home chef Albina Becevello, possibly the only woman he did not objectify in his life. And in his many written messages to Albina with specific culinary requests of all sorts, at any time of day and night, one can find a true praise for her cannelloni. No wonder. The dualistc pleasure of a fresh pasta roll and its filling, poor ingredients and rich finish, can conquer any human heart and stomach.

Cannelloni with aubergine and ricotta (serves 3)

For the pasta
200 g ’00’ flour
2 eggs

For the filling
3 aubergines
250 g ricotta
100 g Parmigiano-Reggiano
1 tbsp olive oil

For the Béchamel/white sauce
100 g butter
100 g flour
1 l milk
1 pinch of grated nutmeg
1 pinch of salt

For the finish
20 g Parmigiano-Reggiano

Start with the pasta mix: prepare the flour fontana, crack the eggs in it, slowly break the eggs into the flour well, and stat amalgamate the whole into a doughy ball. Knead it for at least ten minutes till it becomes smooth, cover in cling film, and let rest for at least 30-40 minutes.

Chop the aubergines, place them in a sieve and cover them with a weight to let them lose their water (you can salt them in the meantime, if you prefer); when drained, sauté them till golden in a frying pan with the oil. When almost entirely cooked, let them cool down, and then mix them with the ricotta and the Parmigiano-Reggiano.

The Béchamel is ready in a few minutes as well. To help the preparation, leave the milk out of the fridge for a little while, to reach room temperature. Start from the roux, melting the butter and adding the flour–sift it if you can, it will make the sauce smoother. After a couple of minutes with the flour, the roux should turn light gold: slowly add the milk with the fire still on and whisk the mix. When it thickens, sprinkle with grated nutmeg and a pinch of salt.

Work the pasta dough with the rolling pin, till you can make rectangles about 15 x 10 cm, roughly 2 mm thick (I made 14 squares). If you want to make your life easier and the pasta a little bit better, dust the table with some flour and some semolina, but never the rolling pin! Boil the squares–ideally one or two at a time–and prepare the filling in a piping bag. Take one square, fill it with the aubergine and cheese mix, and roll into one cannellone. Prepare the oven tray with a base of Béchamel sauce and start lining the cannelloni while you make them.

IMG_4308.JPG

Once prepared the tray, cover the cannelloni with more Béchamel sauce and dust with grated Parmigiano-Reggiano. Bake in hot oven at 200ºC/180ºC fan/mark 6 for about 20-25 minutes, plus an additional 5 minutes to grill.

IMG_4311.JPG

by Max

Sweet Treats: Cake Decorating

20160312_190704~2~2

I love making cakes! From looking through recipes, checking pictures on the internet, searching for random ingredients, and spending a small fortune in cake shops on fancy tins and glitter. I enjoy the planning and preparing, and of course happy faces of my friends eating my baked goods. But then I struggle when it come to finishing and decorating the cake. There has been times when I felt like putting the cake straight to the bin because of a very disappointed look of the final monstrosity. So, I decided a way forward would be to go for a course and learn what exactly needs to be done and what exactly I am doing wrong when it comes to the buttercream.

Last Saturday, while most of people stayed in their warm beds, I crossed foggy and cold South London and made my way to A Techniques with Buttercream class, in Cakes4fun in Putney.

I was a bit apprehensive and not sure what to expect, as I have never done any cooking or baking classes. However, I was welcomed by a lovely shopkeeper who asked me to wait a bit for our tutor. This gave me a perfect opportunity to look around a small shop with generous amount of edible glitter, food colourings, tins, and cupcake cases. Of course, I love glitter so much that I was already tempted to spend my cash.

Our tutor for the day was a charming lady called Pervin. She has a great knowledge of cake baking, decorating, and chocolate making. On top of the extensive qualification, she also has valuable experience in working in kitchens and baking for paying customers. Her approach was friendly and very professional. She was happy to share her knowledge and useful tips on what to do with buttercream, why air bubbles form and what to do about it, and she explained us which utensils are the best to use.

The room was very comfortable and had a wonderful display of decorated cakes. There was five students in total and we all had plenty of work space. We were given an apron, some basic utensils, cake boxes with cake boards to take our cakes home, and a guide with a few recipes and a description on what buttercream styles and type we were going to do.

During the morning, we cut, trimmed, and prepared our three sponges, so that we could practice our pipping techniques in the afternoon. The first technique was the most simple and we used our chocolate cake to create petal appearance. This was fairly easy, but still gave us a chance to work with temperamental chocolate and bubbly buttercream. The second technique was to decorate a lemon cake with horizontal thrills, zig zag or two different flower patterns. I enjoyed this part the most as I was always excited to learn how to make a pretty feminine cake. Pervin was excellent in showing and describing the pipping techniques and the steps needed to make our cakes looks tidy and uniform. I tried all three different ways but settled to finish my lemon cake with a delicate rose pattern.

20160312_190743~2

The last technique we did was a pink rose cake. I have seen this particular style and I can say it is the most beautiful and elegant of all. By adding extra pink colour we could also create shaded roses.

The pace of the course was perfect and gave us enough time to focus on each task. Pervin is extremely talented and her charming and honest personality made a world of a difference in  understanding the buttercream. She was more than happy to answer any of our questions and give us advice about any home electricals, piping nozzles, and what kind of ingredients are the best to use.

20160312_185821~2

I thoroughly enjoyed the course and would definitely come back for more. And if you are looking to learn about cakes check out Cakes4fun courses (The Techniques with Buttercream course run from 10 am to 4 pm, with a fee of £99). I am sure you can find something interesting too.

by Maria

Sweet Treats: Mango & Lemon Curd Cake

20160306_105625~2~2
This cake came about as an inspiration for Mother’s Day celebration. Not being British, I am used to celebrating this very special day later in the year. However, here in UK we remember our precious mums in the beginning of March. So, I wanted this cake to be very feminine, delicate, and full of wonderful surprises.

It all started with a mango I bought a couple of days ago, which had to wait patiently in my kitchen for a few days to ripe and become sweet and juicy. Once I figured out the filling with a tangy lemon curd, I realized I would also like to change the colours of each layer. And, of course, what colour would be better than soft pink and light purple? I thought it would make the perfect Mother’s day cake. Light and fresh, sweet, and a bit different…

Mango and Lemon Curd Cake (serves 6-8)

4 medium eggs
225 g softened unsalted butter
220 g self raising flour
220 g caster sugar
2 tsp baking powder
1 tsp vanilla essence
pink and purple food colouring

For the butter-cream filling
175 g unsalted butter
370 g icing sugar
2 tbsp milk
100 g lemon curd
one ripe mango, cut into small chunks

Preheat the oven to 180° C/150° C fan. Grease the tins with butter and dust with flour, or with greaseproof paper. For this cake I used 4 cake tins (each 4″, but 5″ would also work).

Whip the softened butter with sugar until pale, and then add eggs, and the rest of the ingredients. Mix until combined. The mixture should be light and easy to spread. Do not over-mix as that would stop sponges from rising.

Be careful when adding the food colouring. The best way is to use a tooth sticks. Add a tiny bit if pink food colouring and mix thoroughly. This layer could also be left white, if you prefer. Transfer a small amount into the first cake tin. Add more pink colouring and mix again. This layer should be light pink. Transfer the second cake mixture to the cake tin. Then, add even more pink colouring to create a very deep shade of pink. Fill the third cake tin. Finally, add purple food colouring to get a dark and rich purple cake mixture. Fill the last cake tin and putt all tins into the oven. Leave to bake for about 12-15 minutes. You might need to rotate your tins in the oven to allow even bake. Cake is baked once it starts to come way from the edges.

Release all baked sponges from tins and leave to cool on the side, preferably on a cooling rack if you have one. Once all sponges are at room temperature, trim each one so that they are all same height.

For the butter-cream filling, whip all of the softened butter with the icing sugar. You might want to add some milk to make the mixture lighter and easier to work with. Spread the lemon curd onto the bottom purple sponge and also onto the light pink sponge; spread a small amount of the butter-cream on the dark pink sponge.

20160305_163622~2

To assemble, place the purple sponge at the bottom, then dark pink sponge, followed by light pink sponge and finally the lightest sponge. Cover with some of the butter-cream and smooth the sides and edges. Leave in a fridge for about 20 minutes to harden. Add a small amount of pink food colouring to the leftover butter-cream and spread around the sponge but not on the top. Carefully smooth the sides of the cake and then the top of the cake.

20160306_104855~2~2~2

by Maria

Sweet Treats: Chocolate Macarons

20160128_224853~2.jpg

Colourful, chewy but crisp on the outside, delicate but full of rich flavours hidden in the fillings. Macarons are becoming ever so popular these days. Internet is flooded by these brightly coloured sweets, sometimes with rather fancy and exotic fillings. They are most certainly nothing new, as the first mention of macarons dates back to the sixteenth century! At the time there wasn’t any filling to join two macaron shells together. That changed only at the beginning of the twentieth century, when Pierre Desfontaines, the grandson of Louis Ernest Laduree, decided to use chocolate ganache.

Some say that making these delicacies is not easy, even though the ingredients are so beautifully simple. To make things even trickier, there are two different ways of preparing the meringues for your macarons. You can either follow the French technique or the Italian one. I prefer using the French method, as it does not involve any use of the temperamental hot sugary syrup.

You can experiment with any colour you wish, but remember to use either gel or powder food colouring. Introducing additional liquid to meringues would ruin the macaron. I added one teaspoon of cocoa powder to my meringues to complete the chocolate theme.

Chocolate French Macarons

95 g egg white
75 g caster sugar
152 g icing sugar
123 g ground almonds

For the chocolate ganache
80 ml double cream
100 g dark chocolate

Whip the egg whites until still. Keep in mind that you have to add the caster sugar gradually while you are whipping the egg whites. This allows the macaroons to develop their characteristic shine. Sift flour and icing sugar in a separate bowl and add ground almonds. Slowly fold the flour mixture to the egg whites and be very careful not to over-mix.

Transfer the mixture to a piping bag and pipe onto a baking sheet. Always make sure that all piped macarons are the same size, as making them in different sizes would burn the smaller ones. Drop the baking tray on a flat surface to allow air bubles to come out: in simpler words, knock the air out. Allow to stand for 10-15 minutes until the surface of each macaron is no longer sticky. This allows the macaron to rise evenly when baking. Preheat the oven to 170°C/150°C fan/mark 4.

Put into the oven for 10-13 minutes. Keep checking during the baking as you might need to rotate the tray to allow an even bake.

Once baked, allow to cool down, and then transfer from the baking sheet. Be careful when taking macaroons shells from the baking paper as they are very fragile and sticky.

For the chocolate ganache, bring the cream to boil on a low heat. Then pour over broken chocolate and leave to stand. Mix together with a spoon and leave to stand preferably in a cool place. Once thick enough, transfer into a piping bag.

20151205_133618~2

Match two shells so that their size will be as similar as possible. Pipe a little bit of chocolate ganache on one macaron shell and sandwich together with the second one. Leave to cool in the fridge. Macarons are best on the next day and ideally kept in the fridge. Take them out of the fridge about an hour before eating, to allow the ganache to warm up to room’s temperature.

by Maria